Summer is here…and a new royal baby

canstockphoto3628015

Summer’s actually been here for about two weeks, and though we’ve all been looking forward to it, it didn’t come without it’s most frustrating companion – hay fever. While many look forward to its arrival with anticipation, I and some others look forward to it with mostly trepidation as I usually have hay fever for the whole of summer. If it’s hot, the pollen count high, and pollens flying like a legion of demons, it usually spells a summer doom for people like me. So, I’d been having particularly bad summer until my colleague suggested I try homeopathic remedy about three weeks ago. And did I notice the difference? Oh yes! I have had almost two weeks free from sneezing, itchy eyes, nostrils and palates, and the incessant nose-blowing that is so typical of hay fever. It’s unbelievable!

The thing with homeopathic remedies I gather is, there’s no ‘one medicine cures all’. I was interviewed by the pharmacist who noted all my symptoms before giving me a prescription. I don’t claim to understand how it works, but I’m a very happy bunny at the moment, and I’m looking forward to enjoying the rest of the summer, and very many more to come, I hope.

And we have a new royal baby boy; congratulations William and Kate. May you have many, many happy time with your new bundle of joy.

Where…

…have I been?

Good question. It’s been a long time since I posted. Reason? Work. I’ve found it very difficult combining that with jewellery making and home-keeping. During the past 7 months, I often wondered how a lot of jewellery artists who have full-time jobs combine the two. By the close of work every day, and after running after the little ones, I am so tired that I usually doze off while using the laptop. The fact that I do not have a dedicated work area I think is a contributory factor, because I seem to spend more time setting and packing up than actually making things. Oh how I long for SPACE… (sigh)

That said, I made some virtual friends during my sabbatical and learned new skills (not quite to perfection, but practice they say makes perfect). I came across Nancy LT Hamilton and her very educative videos on you tube. She also has a blog with numerous great tips which I find very useful.

Though I didn’t do much in terms of creating, I did a lot in terms of self-development. I spent more money, bought yet more tools (am I alone? I think I must have bought more in those months than previously put together). I learnt basic silversmithing and stone-setting with the help of John Cogswell and Joe Silvera (no, I didn’t attend their classes though I wished then that I live in the US, I had to make do with their books), and of course from the numerous tutorials/videos that abound online from generous teachers. Thanks to all the wonderful people who take time out to enlighten people like me with free materials.

There were a great deal more frustrating moments than successes, but I picked up a lot of skills along the way. Will try to put up pictures of both the successful and the opposite. Till next time, thanks for stopping by.

I am well…a lurker


A fellow Folksy crafter, Lu of Found In Keswick, wrote about this topic in this post – “Are you a lurker?” – sometime ago, and it struck a cord with me. I read it and said to myself, “I am well…a lurker, but I can’t help myself”.

I joined the Yahoo Metal Clay forum about a year ago (and many more since). It’s a fantastic forum of fabulous and generous people who do not hold back at sharing their knowledge with lesser knowledgeable people like me, and I find myself looking forward to the almost daily questions, answers, tips, etc. BUT I don’t think I’ve ever answered any of the questions even though I know the answer. My excuse? I’m an almost novice in the medium, and someone else may have a better answer.

We all have different reasons for lurking. Fear of saying the wrong thing, lack of time, or just plain nonchalance, but the fact is we’ll learn more by sharing what we know because who knows? it might be that we actually don’t know.

Aha!

I had an ‘aha!’ moment a few days ago. I had mentioned in this post my love for a really polished finish on my pieces but that I have to apply a lot of elbow to get that finish. Yes, you guessed right, I didn’t like it at all. Getting a polished finish on fine silver is not so much trouble, but on base metals is another story altogether. I knew there were tools made especially for polishing, etc., but they are certainly beyond me. The answer meanwhile had been right in my face all along – the rotary tool. This is a hand held power tool with a variety of rotating accessory bits and attachments that can be used for cutting, carving, sanding, polishing and many other applications. I had first come across using it for finishing metal clay in Hadar Jacobson’s books but I forgot all about it especially as she only demonstrated with emery papers.

A popular rotary tool is the dremel, but I have a Proxxon FBS 240/E that I bought years ago to cut jumprings and if I had bothered to pay more attention to it and the accompany accessories, I would have realised that it would be useful for finishing my pieces. So, last week I decided to try it with polishing papers. Let me say here that you should take precautions before using this AND any other motorised tool, and this means a pair of wrap-around safety glasses, dust masks, finger protection, etc.

Straight mandrel with ‘ahem’, dirty 400 grit polishing paper

I first use it with 400 grit emery paper on fine silver (coarser grit on the base metals, as they’re harder), then the polishing papers in order, from the coarsest to the finest. To load, I insert the paper into a slotted mandrel, wind it round and hold it down with cellotape. I set my rotary tool to the lowest speed and then the fun begins.

By the way, the picture above shows the straight slotted mandrel, but there’s also the tapered one.

It’s the September CRAFTfest countdown

My first ever craft fair is six days away (depending on who’s counting), and it is a virtual fair (see post). Prior to signing up, I didn’t know that there was such a thing and I always thought that I’ll have to get a booth and all the accompanying necessities in order to participate in one. And we won’t have to bother about the unpredictable weather (this morning was quite cold, and we’re in the last week of August) as we’d have to if we were putting up booths in a park or so. It’s almost a win-win situation (it’ll be a win-win when I make my first sale). So when I came across a post related to CRAFTfest on Folksy forum, I didn’t hesitate for a moment before signing up. I’d love to make some sales, but more importantly, my shop needs to be known as it’s only a couple of month old. So, fingers crossed.

I promised when I signed up that I’ll do my share of promoting fellow stallholders and that includes tweeting and following, stumbling (thought only people who’ve had too much to drink stumble, may be not all, but well…), ‘facebooking’ and pinning amongst the several social media currently available. I can now confirm that it can be a lot of work doing all these and more, especially if you’re a semi-lurker like me, but who’s trying to reform. In all honesty, I’ve not done a lot but I hope to improve. Thanks to CRAFTfest, I now have a facebook page, and can pin as well as tweet; however, I’ve not gone round ‘stumbling’ yet.

So this week like I did the last time, I’ll be featuring some of my fellow sellers in the purple group that I didn’t feature then.

Group 8


Group 9

Group 10

A lot of people have put a lot of effort into organising, and especially holding the hands of stallholders like me who are new to craft fairs. This is thanking Gill, Lu, the other group leaders, and all who’s been very helpful to all. Do not forget to join us from the 1st to the 8th whether you’re a crafter, a buyer or even a browser, you won’t be disappointed.

Off to putting some jewellery pieces in my stall.

Copper clay …a very pleasant surprise

Yes, I know. I should have given an update about my first encounter with Metal Adventures’ Copprclay two weeks ago, but between getting ready for my first ever fair – CRAFTfest and taking care of a baby, there is little or no time at all to do anything else. And of course, the Olympics, how can I forget that?

First of all, congratulations to Team GB, they did marvelous right up to the end. They really did us all proud. And to the other countries who participated. There were many memorable moments for me, but the one I will never forget was the encouragement spectators gave a female athlete from Saudi Arabia I think, who though came last in one of the races, but who finished the race with a resounding applause from the spectators.

Okay, back to the topic of the day. I opened my kiln the next morning, took out the pieces and found them looking okay (no obvious sign of under/over-firing) and with some kiln patina in places. But having had almost a year’s experience with firing FASTfire Bronzclay (let me say here that a good number of those firings brought tears to my eyes), I knew that seeing is not always believing. So, I checked to see that every piece fired well by first trying to bend my test piece. The piece was about 3.5mm thick, it bent to 180 degrees with some sweat. I had to employ the services of MDH to bend it, and it wouldn’t go beyond 180 degrees as it was too short, first test passed. I measured with my eyeometer, and saw that they all shrank about 20% (see pictures).

So I felt more confident. Then, I threw my real pieces on my kitchen floor to see if they’ll break, but they didn’t, and that confirmed to me that they fully sintered. I then steel-brushed them and the well-known pinkish colour associated with copper presented itself.

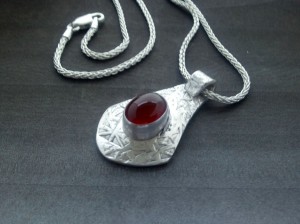
Though not bad-looking with their natural colour, I decided to patina them instead, and that also gave me some hassles. I first tried the much acclaimed heat patina I’d heard so much about on a pair of earrings, but I didn’t get similar colours on each. So, I decided to use liver of sulphur (LOS). Unlike fine silver, it’s not possible to remove patina from copper with flame, so I just forged ahead. I then found that it reacted very quickly with LOS, and I found it almost difficult to control. It even seemed to me that it kept on reacting to the LOS even after neutralising with baking soda.

Lest I forget, I found it very messy to work with and calling it dirty will not be far from right, but it doesn’t dry as fast as fine silver metal clay, so, you have a longer working time with it. All in all, I’m very happy with my first attempt, so much so that I’m currently working on mixing it with FASTfire Bronzclay in a bangle. I’ve decided to add only a little copper to this bangle as it sinters at a much higher temp (954 degrees celsius) than FASTfire Bronzclay (810 degrees celsius). Firing a piece that combines the two will have to be done at the lower temperature lest the bronze overfires.

Here are the finished pieces, after patinating and given a protective coating.

CRAFTfest (September 1st to 8th)

I signed up to my first ever fair a few weeks ago – CRAFTfest, and if you’re wondering what it’s about, it’s an online craft fair where crafters get to showcase their work and put their business right at the heart of the Crafting Community. I am so looking forward to it and I’m sure you’d not want to miss it too, so pen down the dates in your diary.

Crafters have been grouped into teams and I’m in the Purple Group with Gill of PSInteriorsUK as our group leader. I have begun to fill my stall with jewellery pieces that will be for sale (subject to availability during that week), and Gill has been doing wonderful work in holding everyone’s hands especially people like me who are first timers. She’s put up the complete list of stall holders on CRAFTfest’s blog, and I will be sharing some of them with you to give you an idea of what to expect during that week. Click on the pictures to go to our stalls.

So, do not forget, and remember to tell friends and family. And there’s no starting and closing times, you can visit all day and at anytime in the comfort of your home.

Group 1

Group 2


Group 3


Group 4

Group 5


Group 6

Group 7

And there’s me, can’t believe I actually forgot all about myself. I need to update my stall though, I have lots of interesting things to list. Promise.

Copper clay …first attempt

I’ve been taking it really easy for the past couple of days. With the Olympic starting last weekend, I’ve done next to nothing except watch and support Great Britain. Even though things were a bit slow for Team GB, they really did very well today, getting medals in Cyling Track and Canoe Slalom/Kayaking. The medal count rose dramatically from 6 or so yesterday to 15 today. Amazing!

In the midst of it all, I managed to open the package of copper clay I’ve had for months now and made a few pieces. The brand I bought is Copprclay made by Metal Clay Adventures. I love the look of copper, and the fact that it takes patina beautifully, but I’ve never wanted to work with it because firing can be a hassle (as with all base metal clays). Not only can they take forever to fire, but also, the results are not guaranteed like the fine silver clays (it took almost 10 test firings and lots of research for me to get to an almost fool-proof schedule for Fastfire Bronzclay). That said, I was tempted to try copper clay after coming across Wanaree Tanner‘s blog and copper clay firing guide.

Unlike the silver clays which are a dream to fire, firing base metal clays successfully depends on a multitude of things – type of kiln, firing container, type of carbon, etc. So, after making a few pieces and of course, a test piece (very important with base metal clays so as not to ruin your masterpiece either due to under/over firing, distortions, etc.), I put my 5 cards thick test piece (approx. 6/16″ by 1 9/16″) and a pair of 3 cards thick earrings (approx. 1/4″ by 1 13/16″) in the kiln to fire.

I noticed the following while constructing the pieces:
1. It remained somewhat flexible even after drying, so corrections can be made with care.
2. It also carved easily as I tried my newly-acquired Dockyard carving tool on a piece (not anything tech, more like drawing lines really). Carving silver clay can be a little tricky as it can chip easily in the dry stage.
3. It warped while drying especially on my mug warmer, but I was able to correct it by placing a heavy book on it as well as gently using my fingers to re-shapen. From what I saw, the warp formed in the first few minutes when the clay was quite wet, and formed a concave shape. I then removed it from the mug warmer and pressed it down gently in the middle before putting it back.
4. Joining dry parts require more paste, and it has to be of a thick consistency, or parts will fall off. I’d read about this and was prepared. I used a mixture of thick paste and slightly running paste with a drop of lavender oil in it.
5. It took longer to get to the firing stage as I had to combine air-drying with my mug warmer to prevent warping.

Just heard the sound of the kiln telling me it’s finished firing. I’ll leave checking the pieces till tomorrow, and in the meantime pray that by some stroke of luck, I got it first time. Tomorrow will tell.